Creating Database Connections and Schemas
OneStream uses three database schema types, Framework, Application and State. The sections below describe the two schema types in detail and provide instructions on how to use the OneStream Database Configuration Tool to create connections and schemas.
NOTE: When upgrading, Database Schema updates may need to be implemented as part of the upgrade. Full Database Backups are required for any databases you will be updating (Framework and any Application databases).
SQL Database Considerations
To create an Azure ready database, the Use File Groups property must be unchecked when creating the Application Database Tables. Doing this will create a log file and a database file and ensure that Azure can be supported at any time. This option applies to SQL 2017 and higher. A new application database will need to be created to utilize Azure in the future.

Microsoft does offer a utility to migrate from a classic SQL Enterprise database using File Groups to a non-File Group. The information can be found here: https://azure.microsoft.com/en-us/blog/migration-cookbook-now-available-for-the-latest-azure-sql-database-update-v12/
Framework Database
Framework can be thought of as the system database. This database contains system level information and servers as a controlling database or gateway to accessing application data. OneStream always connects to just one Framework database which is specified during the application server configuration process. The Framework database maintains the list of application databases that are associated with the OneStream instance.
The Framework Database contains the following data elements:
-
Users
-
Groups
-
System Roles
-
Environment Metrics
-
Task Activity Log
-
Error Log
-
Application Definitions
-
System Level Report and Dashboard Definitions
Creating a Framework Database
To create a new Framework database schema, launch the OneStream Database Configuration Tool on a machine that can connect to the SQL Server instance that will host the database. Next, follow the steps listed below:
-
Select the top item titled Databases in the left tree control.
-
Right-click the node to show the context menu.
-
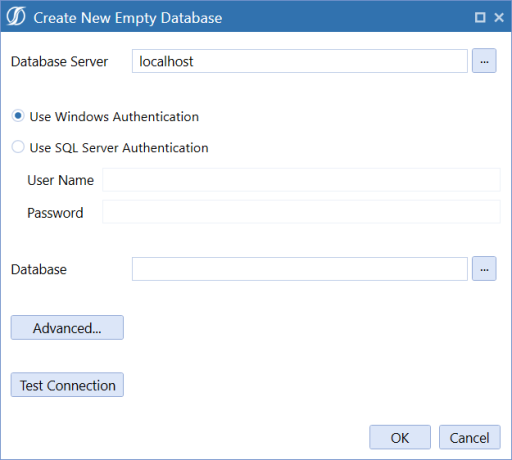
Select Create New Empty Database from the menu.
-
Use the standard database creation dialog to specify the Database Server Name, Authentication Method, and the Database Name.

-
Click Advanced and set the Connect Timeout to 60 and the Max Pool Size to 5000.
-
Click OK.
-
Select the newly created database in the left tree control.
-
Right-click the selected item to show the context menu.
-
Select Create Framework Database Tables from the menu.
-
Choose Use File Groups and/or Use Table Partitioning and click Create Tables. These are selected by default.
-
Select this database in the list under Databases.
-
Right-click and select Apply OneStream License.
-
Paste your OneStream license key that was sent to your company in this field and click Save.
-
Restart IIS to accept the license key.
The new Framework database is ready for use.
Application Databases
Application can be thought of as a data content database. Each OneStream instance can access many Application databases. An Application database contains information specific to a set of Financial Models and the Workflows used to manage the models. The system can be configured so that users can create new Application databases in the product or this task can be restricted, so that a database administrator must use the OneStream Database Configuration Tool to create new Application database schemas which are then attached to the Framework database.
An Application database contains the following data elements:
-
Application Roles
-
Cube and Dimension Definitions
-
Workflow Definitions
-
Data Transformation Definitions
-
Data Quality and Certification Definitions
-
Staged Data
-
Cube Data
-
Certification and Sign-Off Data
Creating an Application Database
Application databases can be created directly in OneStream or by using the OneStream Database Configuration tool.
First, launch the Database Configuration Tool on a machine that can connect to the SQL Server instance that will host the database.
Next, follow the steps listed below:
-
Select the top item titled Databases in the left tree control.
-
Right-click the node to show the context menu.
-
Select Create New Empty Database from the menu.
-
Use the standard database creation dialog to specify the Database Server Name, Authentication Method, and the Database Name.
-
Select the newly created database in the left tree control.
-
Right-click the selected item to show the context menu.
-
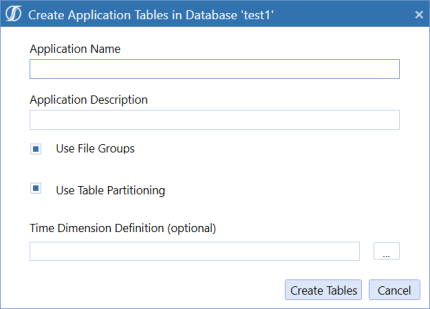
Select Create Application Database Tables from the menu.
-
This launches the following dialog.
-
Specify the Application Name and Description.
-
Select Use File Groups and/or Use Table Partitioning. These are selected by default.
-
Click the ellipsis to select a pre-configured Time Dimension xml file
If a Time Dimension Definition is not specified, the application database will default to the Standard Time Dimension Type. This creates a Monthly Time Dimension and stores the data by month in the data tables. All applications created prior to Version 4.1.0 are using this Time Dimension Type. Refer to Time Dimensions in the Design and Reference Guide for more details. -
Click Create Tables.
-
(Optional) Rename Application: If the new Database Connection is a copy of an existing OneStream Application database accessed in the same OneStream environment, you must give this application a new name. Right-click this database and select Rename Application. Type a unique Application Name. The Application Description field is optional and leave Create New Application Unique ID as checked. Click Rename.
State Database
State can be thought of as a temporary database. OneStream uses the State database to store temporary report state information. This schema can be deleted and recreated at any point because the information contained in the database is only relevant to a user’s current session.
Creating a State Database
To create a new State database schema, launch the OneStream Database Configuration Tool on a machine that can connect to the SQL Server instance that will host the database. Next, follow the steps listed below:
-
Select the top item titled Databases in the left tree control.
-
Right-click the node to show the context menu.
-
Select Create New Empty Database optio from the menu.
-
Use the standard database creation dialog to specify the Database Server Name, Authentication Method, and the Database Name.
-
The tables for this database are created on demand by OneStream.
The new State database is ready for use.
Exporting Database Connections
OneStream uses the Database Configuration Tool to manage and create database connections in isolation from the server configuration process. Once a database or database connection has been created in the OneStream Database Configuration Tool, a file can be exported from the tool containing a list of encrypted database connections.
Each OneStream application server configuration file stores a database connection string pointing to the host SQL Server. This connection is then used in combination with Framework and Application database names to establish connection to databases.
To make process of assigning a database connection to an application server, the exported database connection file can be imported into the OneStream Server Configuration Tool.
Managing Data Record Storage
OneStream applications can have a monthly or weekly Time Dimension. The pre-fixed Time Dimension Types determine if a particular application is monthly or weekly and the type of calendar used (e.g., 445, 454, etc.) A Custom Time Dimension Type allows users to specify the number of months in a quarter and the number of weeks in a month and can only be applied to new applications. All applications created prior to Version 4.1.0 are using the Standard Time Dimension Type which creates a Monthly Time Dimension and stores the data by month in the data tables. Standard monthly applications can be converted into a weekly application by copying the application’s data into binary data storage.
The implications of this action are very serious because of the effect this can have on existing reports, objects using specific time logic and how data is processed going forward. OneStream requires an application review before any existing application converts from standard to binary. Contact OneStream Support to further discuss this process.